
Appearance
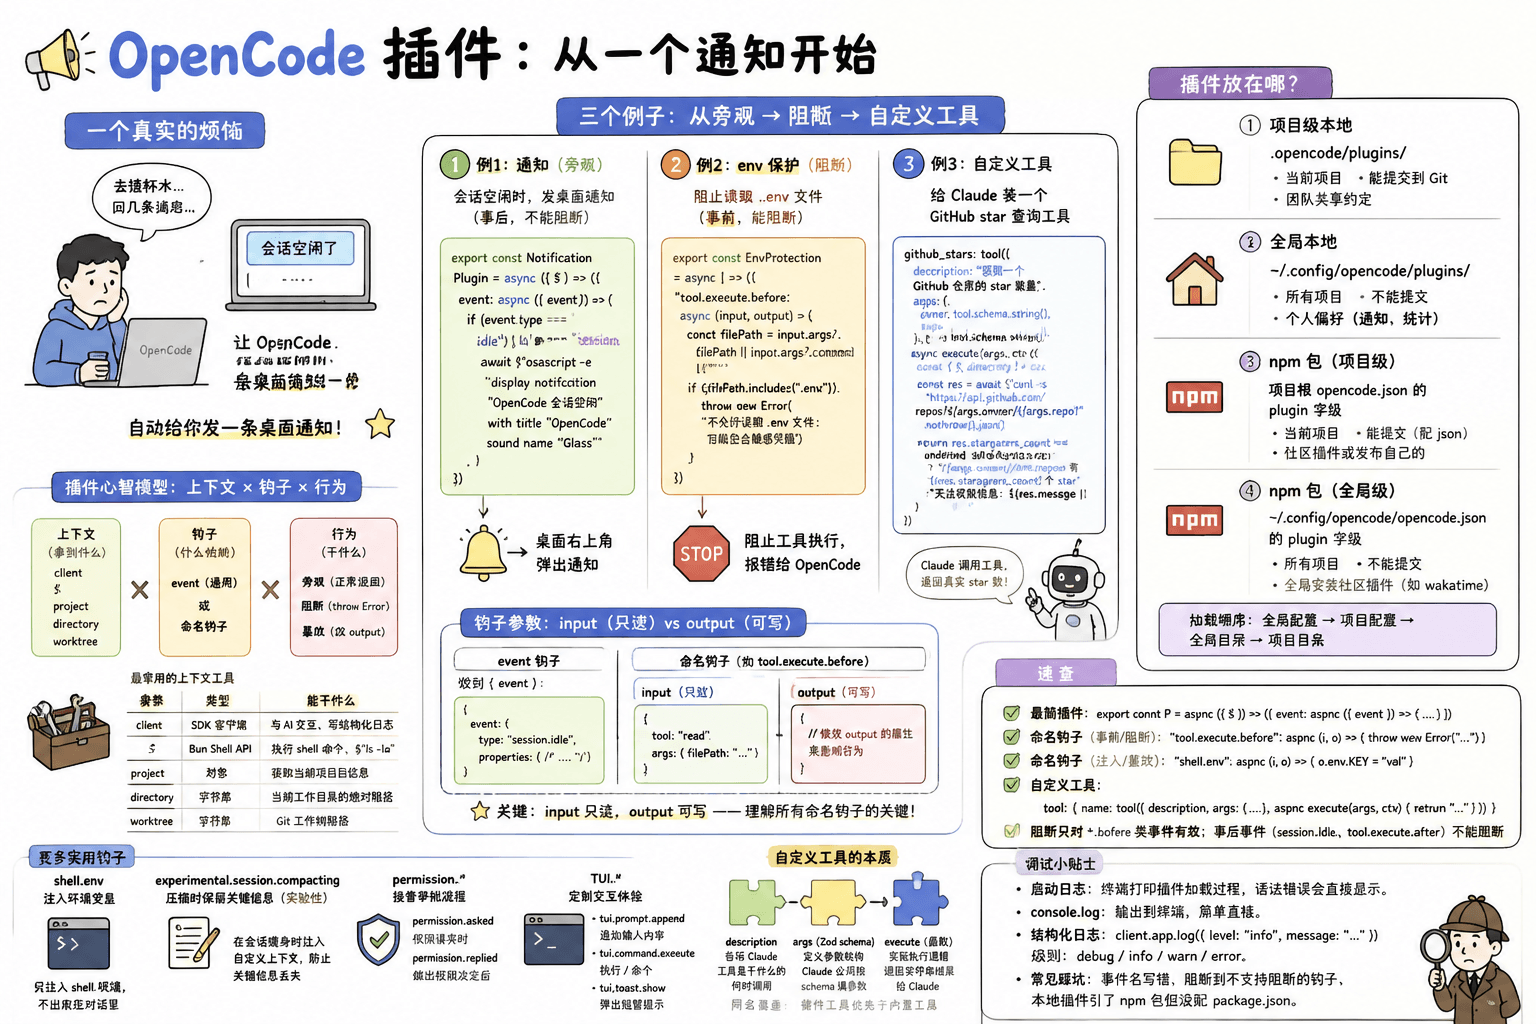
OpenCode 插件:从一个通知开始
一个真实的烦恼
你用 OpenCode 写了一下午代码,中间去接了杯水、回了几条消息。回来一看,OpenCode 早就在那等着你了——会话变空闲了,但你不知道它是什么时候停的。每次都要切窗口看一眼才能确认进度。
插件能解决这个问题:让 OpenCode 在会话空闲时,自动给你发一条桌面通知。
下面我们从零开始把这件事跑通。
第一步:写出最简插件
在项目根目录创建 .opencode/plugins/ 目录(如果还没有),然后新建一个文件 .opencode/plugins/notify.js:
js
export const NotificationPlugin = async ({ $ }) => {
  return {
    event: async ({ event }) => {
      if (event.type === "session.idle") {
        await $`osascript -e 'display notification "OpenCode 会话空闲" with title "OpenCode" sound name "Glass"'`
      }
    },
  }
}
这个文件就是你的第一个插件。三件事:
- 导出一个异步函数 — OpenCode 启动时会调用它,传入上下文(这里只用了
$,Bun 的 Shell API) event钩子 — 这是最通用的钩子,所有生命周期事件都会走到这里event.type过滤 — 只在"session.idle"时触发,然后调用 macOS 的osascript弹通知
前置依赖:这个例子依赖 macOS 的
osascript命令。Windows 用户可以用 notify-send 替代;Linux 用户用notify-send。另外,插件由 Bun 运行时执行,确保你的 OpenCode 是完整安装。
第二步:让 OpenCode 加载它
不需要额外配置。本地插件放在 .opencode/plugins/ 目录下,OpenCode 启动时会自动加载。
现在启动 OpenCode,随便发几句话,然后停下来等待。一旦会话进入空闲状态,你的桌面右上角就会弹出一条通知。
搞定。就这么简单——一个文件,一个函数,一个钩子,通知就通了。
想确认插件是否加载成功?启动时 OpenCode 会在终端输出插件加载日志。也可以故意在插件里写个
console.log("loaded!"),观察终端输出。
回过头看:刚才发生了什么
整个插件只有三层,对应三个问题:
export const Plugin = async ({ $ }) => {   ← 插件拿到什么?
  return {
    event: async ({ event }) => {          ← 什么时候触发?
      if (event.type === "session.idle") {  ← 具体哪个事件?
        await $`osascript ...`              ← 触发后干什么?
      }
    },
  }
}
这就是 OpenCode 插件的全部模型:上下文 × 钩子 × 行为。
上下文(Context):插件初始化时拿到什么
插件函数接收一个上下文对象,里面是 OpenCode 给你的工具箱:
| 参数 | 类型 | 你能用它干什么 |
|---|---|---|
client | SDK 客户端 | 与 AI 对话交互、写结构化日志 |
$ | Bun Shell API | 执行 shell 命令,类似 $`ls -la` |
project | 对象 | 获取当前项目信息 |
directory | 字符串 | 当前工作目录的绝对路径 |
worktree | 字符串 | Git 工作树路径 |
日常开发中最常用的就是 $ 和 client。前者让你跑 shell 命令,后者让你跟 OpenCode 的 AI 核心交互。
钩子(Hook):什么时候触发
OpenCode 提供了两种注册钩子的方式:
| 方式 | 写法 | 何时用 |
|---|---|---|
通用 event 钩子 | event: async ({ event }) => {} | 想在一个函数里处理多种事件,自己按 event.type 过滤 |
| 命名钩子 | "tool.execute.before": async (input, output) => {} | 只关心一个特定事件,写法更直接 |
例 1 用的是通用 event 钩子。OpenCode 有 30+ 个事件类型——会话、工具、文件、LSP、权限、消息、TUI 等等。别急着记,后面的例子会覆盖最常用的几个。
行为(Action):触发后干什么
在你的钩子函数里,你可以做三件事:
| 行为 | 怎么做 | 效果 |
|---|---|---|
| 旁观 | 执行自己的逻辑,正常返回 | 不影响 OpenCode 继续工作(例 1 的通知就是这样) |
| 阻断 | throw new Error("...") | 阻止当前操作(仅对 *.before 类事件有效) |
| 篡改 | 修改 output 对象的属性 | 注入环境变量、修改执行参数、追加上下文 |
这就是插件的完整心智模型。下面我们用两个例子分别展示"阻断"和"篡改"。
插件的 input 和 output
在深入例 2 之前,先搞清楚钩子函数收到的参数。
event 钩子的参数
通用 event 钩子收到的是一个 { event } 对象:
ts
{
  event: {
    type: "session.idle",       // 事件类型
    properties: { /* ... */ },  // 事件附带数据,因类型而异
  }
}
命名钩子的参数
命名钩子收到 (input, output) 两个参数,例如 tool.execute.before:
ts
// input — 只读,描述当前操作
{
  tool: "read",              // 工具名
  args: { filePath: "..." }  // 工具参数
}

// output — 可写,用于影响行为
{
  // 修改 output 的属性来改变 OpenCode 的行为
}关键:input 是只读的事实,output 是你施加影响的出口。这个分离是理解所有命名钩子的关键。
第二个例子:阻止 .env 文件被读取
现在你想确保 OpenCode 永远不会读到你的 .env 文件——里面可能有 API key、数据库密码。
这次用命名钩子 tool.execute.before——工具执行前触发,可以阻断。
.opencode/plugins/env-protection.js:
js
export const EnvProtection = async () => {
  return {
    "tool.execute.before": async (input, output) => {
      const filePath = input.args?.filePath || input.args?.command || ""

      if (filePath.includes(".env")) {
        throw new Error("不允许读取 .env 文件:可能包含敏感凭据")
      }
    },
  }
}
重启 OpenCode,然后让它读 .env 文件试试——OpenCode 会收到阻断错误,工具调用被阻止。
这个例子还展示了命名钩子和通用 event 钩子的区别。写成 event 钩子的话,你需要:
js
event: async ({ event }) => {
  if (event.type === "tool.execute.before") {
    // 用 event.properties 取数据,结构更间接
  }
}
命名钩子直接拿到 (input, output),少一层嵌套。规则很简单:只关心一个事件就用命名钩子,想在一个函数里统筹多个事件才用 event 钩子。
旁观 vs 阻断:两个例子的关键对比
| 例 1:通知 | 例 2:env 保护 | |
|---|---|---|
| 钩子 | event(通用) | tool.execute.before(命名) |
| 触发时机 | 事件发生后(事后) | 工具执行前(事前) |
| 能阻断吗 | 不能(事件已经发生) | 能(throw Error) |
| 典型用法 | 通知、日志、记录 | 拦截、验证、审批 |
| 对 OpenCode 的影响 | 零影响 | 阻止操作执行 |
第三个例子:给 OpenCode 装一个自定义工具
前面两个例子都是"监听已有事件然后做点什么"。插件的另一个完全不同的能力是定义新工具——让 Claude 能调用的工具不只限于 OpenCode 内置的那些。
假设你经常要查某个 GitHub 仓库的 star 数。你可以写一个插件,让 Claude 遇到这类问题时直接调用你的工具:
.opencode/plugins/github-tools.js:
js
import { tool } from "@opencode-ai/plugin"

export const GitHubTools = async () => {
  return {
    tool: {
      github_stars: tool({
        description: "获取一个 GitHub 仓库的 star 数量",
        args: {
          owner: tool.schema.string().describe("仓库所有者"),
          repo: tool.schema.string().describe("仓库名称"),
        },
        async execute(args, context) {
          const { $, directory } = context
          const res = await $`curl -s "https://api.github.com/repos/${args.owner}/${args.repo}"`
            .nothrow()
            .json()

          if (res.stargazers_count !== undefined) {
            return `${args.owner}/${args.repo} 有 ${res.stargazers_count} 个 star`
          }
          return `无法获取 ${args.owner}/${args.repo} 的信息:${res.message || "未知错误"}`
        },
      }),
    },
  }
}注意:这个插件依赖
@opencode-ai/plugin这个 npm 包来获取tool辅助函数和类型。如果本地加载,需要在.opencode/目录下配package.json声明这个依赖。或者直接把插件发布为 npm 包。
重启 OpenCode 后,你现在可以对 Claude 说:"查一下 anthropics/claude-code 有多少 star"——Claude 会调用你定义的 github_stars 工具,拿到真实的 star 数。
自定义工具的本质
tool() 函数接收三个要素:
| 要素 | 代码位置 | 作用 |
|---|---|---|
description | 字符串 | 告诉 Claude 这个工具是干什么的,Claude 据此决定何时调用 |
args | Zod schema | 定义参数结构,Claude 必须按这个 schema 填参数 |
execute | 异步函数 | 实际执行的逻辑,返回字符串结果给 Claude |
execute 函数的第二个参数 context 和插件初始化时的上下文类似,包含 directory、worktree 等——你可以在工具里访问当前项目信息。
同名覆盖:如果你定义的工具名与 OpenCode 内置工具重名,插件工具优先。这个设计让你可以覆盖内置工具的行为。
第三个例子和前面两个的维度差异
前两个例子都在 OpenCode 的"生命周期管线"上挂逻辑——一个挂事后,一个挂事前。第三个例子的思路完全不同:你不是在管线上加阀门,而是在工具清单上加选项。Claude 能调用的工具从"内置的 N 个"变成了"内置的 N 个 + 你定义的 M 个"。
插件放在哪
OpenCode 插件有四种部署方式:
| 方式 | 位置 | 作用域 | 能提交到 Git | 何时用 |
|---|---|---|---|---|
| 项目级本地 | .opencode/plugins/ | 当前项目 | 能 | 团队共享的约定(如 env 保护、自定义工具) |
| 全局本地 | ~/.config/opencode/plugins/ | 所有项目 | 不能 | 个人偏好(如通知、统计) |
| npm 包(项目级) | 项目根 opencode.json 的 plugin 字段 | 当前项目 | 能(配 json) | 使用社区插件或发布自己的 |
| npm 包(全局级) | ~/.config/opencode/opencode.json 的 plugin 字段 | 所有项目 | 不能 | 全局安装社区插件(如 wakatime) |
npm 包通过 Bun 在启动时自动安装,缓存于 ~/.cache/opencode/node_modules/。加载顺序:全局配置 → 项目配置 → 全局目录 → 项目目录。
经验法则:团队约定(如阻断危险操作、注入项目上下文)放项目级 .opencode/plugins/。个人用品(通知、时间追踪)放全局 ~/.config/opencode/plugins/。社区通用能力用 npm 包。
如果本地插件需要外部依赖
在 .opencode/ 目录下创建一个 package.json:
json
{
  "dependencies": {
    "shescape": "^2.1.0"
  }
}
OpenCode 启动时会自动执行 bun install,之后你的插件就能正常 import 这些包了。
进阶:几个值得知道的细节
shell.env:注入环境变量
不想让 Claude 看到你的 API key,但又需要 shell 命令能用到它?用 shell.env 钩子——变量只注入到 shell 环境,不会出现在对话里:
js
export const InjectEnv = async () => {
  return {
    "shell.env": async (input, output) => {
      output.env.MY_API_KEY = "sk-secret-xxx"
      output.env.PROJECT_ROOT = input.cwd
    },
  }
}
压缩钩子:会话瘦身时保留关键信息
OpenCode 会话变长后会触发压缩(compaction)。用 experimental.session.compacting 在压缩时注入自定义上下文,防止关键信息被丢弃:
ts
export const CompactionPlugin = async () => {
  return {
    "experimental.session.compacting": async (input, output) => {
      output.context.push(`## 当前状态
任务:重构认证模块
进度:已完成登录流程,正在处理 token 刷新
阻塞:无`)
    },
  }
}
experimental.session.compacting是实验性事件,API 可能变动。
权限钩子:接管审批流程
OpenCode 在执行某些操作前会征求你的许可。用 permission.asked 和 permission.replied 可以自定义审批逻辑——比如自动放行某些命令,或者把审批请求转发到 Slack:
| 事件 | 时机 |
|---|---|
permission.asked | OpenCode 发出权限请求时 |
permission.replied | 你(或自动规则)做出权限决定后 |
TUI 钩子:定制交互体验
OpenCode 的终端界面(TUI)也有自己的事件:
| 事件 | 时机 |
|---|---|
tui.prompt.append | 向用户的输入框追加内容 |
tui.command.execute | 用户在 TUI 中执行了 / 命令 |
tui.toast.show | 向用户弹出短暂提示 |
TypeScript 支持
如果你的项目用 TypeScript,可以从 @opencode-ai/plugin 导入 Plugin 类型获得完整的类型安全:
ts
import type { Plugin, tool } from "@opencode-ai/plugin"

export const MyPlugin: Plugin = async (ctx) => {
  return {
    tool: {
      mytool: tool({
        // ctx 和 tool 参数的类型自动推导
      }),
    },
  }
}
调试
- 启动日志:OpenCode 启动时会在终端打印插件加载过程。如果插件文件有语法错误,错误信息会直接显示在这里。
console.log:插件是标准的 Bun/Node 运行时,console.log、console.error都会输出到终端。- 结构化日志:用
client.app.log()以结构化格式记录,支持debug、info、warn、error四级。尤其适合排查线上问题。 - 常见踩坑:命名钩子写错了事件名(比如
tool.execute.before少了点号)、throw Error阻断后忘了有些钩子不支持阻断、本地插件引了 npm 包但没配package.json。
速查
插件模型:上下文(client / $ / directory / worktree)× 钩子(event 或命名钩子)× 行为(旁观 / throw 阻断 / 改 output)

最简插件:
  export const P = async ({ $ }) => ({ event: async ({ event }) => { ... } })

命名钩子(事前/阻断):
  "tool.execute.before": async (input, output) => { throw new Error("...") }

命名钩子(注入/篡改):
  "shell.env": async (input, output) => { output.env.KEY = "val" }

自定义工具:
  tool: { name: tool({ description, args: { ... }, async execute(args, ctx) { return "..." } }) }

部署:
  项目级 → .opencode/plugins/
  全局级 → ~/.config/opencode/plugins/
  npm    → opencode.json 的 plugin 字段

阻断只对 *.before 类事件有效;事后事件(session.idle、tool.execute.after)不能阻断