
Appearance
OpenCode vs Claude Code:开源 AI 编程助手的全面对比
概述
OpenCode 和 Claude Code 都是当下主流的终端 AI 编程助手。前者由 Anomaly 团队维护,是完全开源的社区产品(GitHub 140K+ stars);后者是 Anthropic 官方出品、深度绑定 Claude 模型的闭源工具。本文从功能、架构、生态和实际使用体验四个维度进行对比。
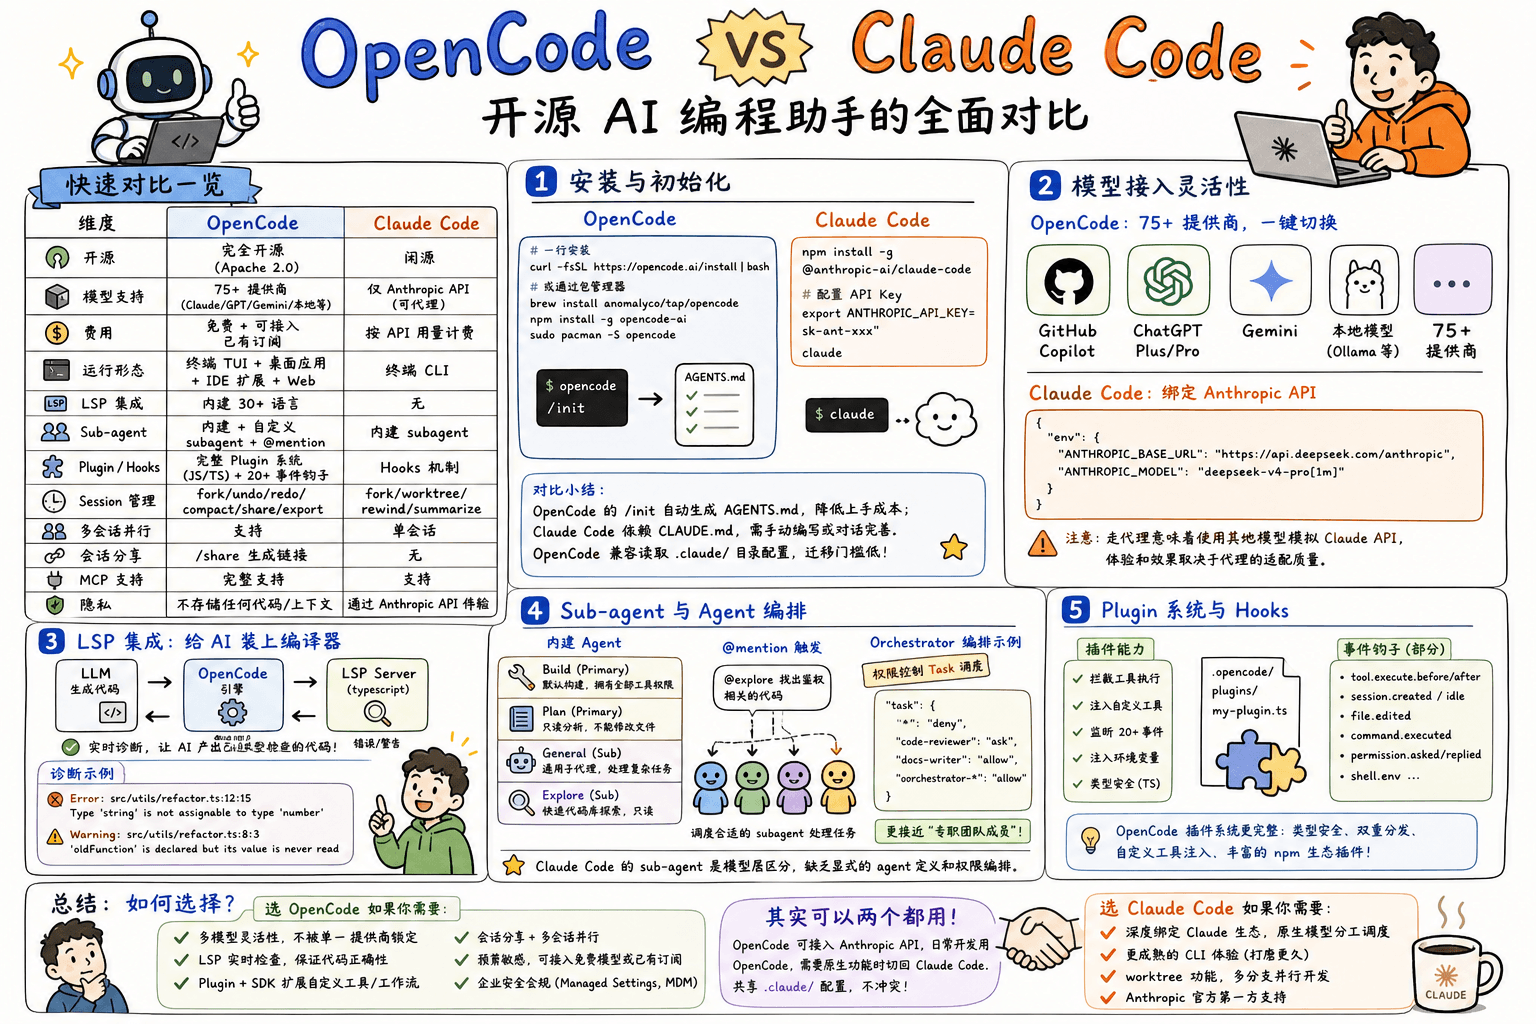
快速对比一览
| 维度 | OpenCode | Claude Code |
|---|---|---|
| 开源 | 完全开源 (Apache 2.0) | 闭源 |
| 模型支持 | 75+ 提供商 (Claude/GPT/Gemini/本地模型等) | 仅 Anthropic API (可代理) |
| 费用 | 免费 + 可接入已有订阅 (Copilot/ChatGPT Plus) | 按 API 用量计费 |
| 运行形态 | 终端 TUI + 桌面应用 + IDE 扩展 + Web | 终端 CLI |
| LSP 集成 | 内建 30+ 语言 | 无 |
| Sub-agent | 内建 + 自定义 subagent + @mention 调度 | 内建 subagent |
| Plugin/Hooks | 完整 Plugin 系统 (JS/TS) + 20+ 事件钩子 | Hooks 机制 |
| Session 管理 | fork/undo/redo/compact/share/export | fork/worktree/rewind/summarize |
| 多会话并行 | 支持 | 单会话 |
| 会话分享 | /share 生成链接 | 无 |
| MCP 支持 | 完整支持 | 支持 |
| 隐私 | 不存储任何代码/上下文 | 通过 Anthropic API 传输 |
一、安装与初始化
OpenCode
bash
# 一行安装
curl -fsSL https://opencode.ai/install | bash

# 或通过包管理器
brew install anomalyco/tap/opencode   # macOS
npm install -g opencode-ai            # Node.js
sudo pacman -S opencode               # Arch Linux
安装后运行 opencode,进入项目目录后执行 /init 即可自动生成 AGENTS.md:
opencode
/init
Claude Code
bash
npm install -g @anthropic-ai/claude-code

# 配置 API Key
export ANTHROPIC_API_KEY=sk-ant-xxx

claude
对比小结
OpenCode 的 /init 命令会分析项目结构并自动生成 AGENTS.md,降低上手成本。Claude Code 依赖 CLAUDE.md,需要手动编写或通过对话迭代完善。OpenCode 还兼容读取 .claude/ 目录下的配置文件,迁移门槛很低。
二、模型接入灵活性
这是两者最显著的区别。
OpenCode:75+ 提供商,一键切换
bash
# 列出所有可用模型
opencode models

# 在 TUI 中用 /connect 切换提供商
/connect
你可以直接使用 GitHub Copilot 账户、ChatGPT Plus/Pro 订阅,或者配置任意兼容 API(包括本地 Ollama、vLLM 等)。配置文件示例:
jsonc
// opencode.json
{
  "$schema": "https://opencode.ai/config.json",
  "model": "anthropic/claude-sonnet-4-5",
  // 或切换到 OpenAI
  // "model": "openai/gpt-5",
  // 或使用本地模型
  // "model": "ollama/codellama:34b"
}
如果你有多个模型,OpenCode 还支持为不同 agent 分配不同模型:
jsonc
{
  "agent": {
    "plan": {
      "model": "anthropic/claude-haiku-4-5"  // 快速规划用便宜模型
    },
    "build": {
      "model": "anthropic/claude-sonnet-4-5" // 写代码用强模型
    }
  }
}
Claude Code:绑定 Anthropic API
Claude Code 只支持 Anthropic API。虽然可以通过设置代理(如 ANTHROPIC_BASE_URL)接入兼容 API,但这是一条非官方路径,缺乏官方支持:
jsonc
// ~/.claude/settings.json
{
  "env": {
    "ANTHROPIC_BASE_URL": "https://api.deepseek.com/anthropic",
    "ANTHROPIC_MODEL": "deepseek-v4-pro[1m]"
  }
}注意:走代理意味着你实际在用其他模型模拟 Claude API 的协议,体验和效果取决于代理的适配质量。
三、LSP 集成:给 AI 装上编译器
OpenCode 内建了 30+ 语言的 LSP Server,能在 LLM 写代码时提供实时诊断反馈。这是 Claude Code 不具备的能力。
工作原理
┌─────────────┐     ┌──────────────┐     ┌─────────────┐
│  LLM 生成代码 │ ──> │ OpenCode 引擎 │ ──> │  LSP Server  │
│             │     │              │     │ (typescript) │
│             │ <── │  诊断反馈     │ <── │  错误/警告    │
└─────────────┘     └──────────────┘     └─────────────┘
实际效果对比
场景:你让 AI 重构一个函数,但它用了错误的类型签名
Claude Code:会基于训练数据的统计模式生成代码,可能在参数类型、导入路径上出错。由于缺乏实时类型检查,这些错误要等到你自己运行 tsc 或 cargo check 时才发现,然后进入"报错 → 再问 AI"的循环。
OpenCode:当 LLM 输出代码后,LSP 立即给出诊断:
LSP Diagnostic (Error):
  src/utils/refactor.ts:12:15
  Type 'string' is not assignable to type 'number'

LSP Diagnostic (Warning):
  src/utils/refactor.ts:8:3
  'oldFunction' is declared but its value is never read
LLM 看到这些诊断后会自动修正,你得到的是已经通过类型检查的代码。
配置示例
OpenCode 的 LSP 按文件扩展名自动启用,也可以精细控制:
jsonc
{
  "lsp": {
    "typescript": {
      "initialization": {
        "preferences": {
          "importModuleSpecifierPreference": "relative"
        }
      }
    },
    "rust": {
      "env": {
        "RUST_LOG": "debug"
      }
    }
    // 禁用某个 LSP
    // "eslint": { "disabled": true }
  }
}
四、Sub-agent 与 Agent 编排
OpenCode 的 Subagent 体系
OpenCode 内建两类 agent:
| Agent | 类型 | 用途 |
|---|---|---|
| Build | Primary | 默认构建 agent,拥有全部工具权限 |
| Plan | Primary | 只读分析 agent,不能修改文件 |
| General | Subagent | 通用子代理,处理复杂多步骤任务 |
| Explore | Subagent | 快速代码库探索,只读 |
Tab 键在 Plan 和 Build 之间切换,@mention 触发 subagent:
# 在 TUI 中输入
@explore 找出项目中所有鉴权相关的代码
自定义 subagent 有两种方式:
方式一:命令行创建
bash
opencode agent create --mode subagent --description "代码审查" --permissions read,grep,glob方式二:Markdown 文件
markdown
# ~/.config/opencode/agents/code-reviewer.md
---
description: Reviews code for quality and best practices
mode: subagent
model: anthropic/claude-sonnet-4-5
temperature: 0.1
permission:
  edit: deny
  bash: deny
---
You are a code reviewer. Focus on:
- Code quality and best practices
- Potential bugs and edge cases
- Performance implications
- Security considerations

Provide constructive feedback without making direct changes.
Agent 编排:Orchestrator 模式
OpenCode 支持通过 Task 权限控制 agent 之间的调用关系,实现类 "agent teams" 的编排:
jsonc
{
  "agent": {
    "orchestrator": {
      "mode": "primary",
      "description": "Coordinates subagents for complex tasks",
      "permission": {
        "task": {
          "*": "deny",                // 默认禁止调用任何 subagent
          "code-reviewer": "ask",     // 调用前需确认
          "docs-writer": "allow",     // 允许自由调用
          "orchestrator-*": "allow"   // 允许系列 agent
        }
      }
    }
  }
}
对比
Claude Code 的 sub-agent 是模型层面的区分(Opus/Sonnet/Haiku),缺乏 OpenCode 这种显式的 agent 定义和权限编排能力。OpenCode 的 subagent 可以绑定特定模型 + 特定 prompt + 特定权限组合,更接近 "专职团队成员" 的概念。
五、Plugin 系统与 Hooks
OpenCode 提供了完整的 Plugin 机制,支持扩展工具、拦截事件、注入环境变量等。
基础结构
typescript
// .opencode/plugins/my-plugin.ts
import type { Plugin } from "@opencode-ai/plugin"

export const MyPlugin: Plugin = async ({ project, client, $, directory, worktree }) => {
  return {
    // 工具执行前拦截
    "tool.execute.before": async (input, output) => {
      if (input.tool === "bash") {
        // 对所有 bash 命令做安全转义
        output.args.command = escapeShellArg(output.args.command)
      }
    },

    // Session 完成通知
    event: async ({ event }) => {
      if (event.type === "session.idle") {
        await $`osascript -e 'display notification "Session done!" with title "OpenCode"'`
      }
    },

    // 注入自定义工具
    tool: {
      deploy: tool({
        description: "Deploy current project to staging",
        args: {
          environment: tool.schema.string(),
        },
        async execute(args, context) {
          const { directory } = context
          const result = await $`cd ${directory} && ./deploy.sh ${args.environment}`.text()
          return `Deployed: ${result}`
        },
      }),
    },
  }
}
可用的事件钩子(部分)
| 事件 | 触发时机 |
|---|---|
tool.execute.before | 工具执行前 |
tool.execute.after | 工具执行后 |
session.created | 新 session 创建 |
session.compacted | 上下文压缩 |
session.idle | session 完成 |
command.executed | 命令执行 |
file.edited | 文件修改 |
permission.asked | 权限请求 |
permission.replied | 权限回复 |
shell.env | Shell 环境初始化 |
对比
Claude Code 提供 hooks 机制,但主要围绕文件变更和 shell 命令。OpenCode 的 Plugin 系统更完整:
- 类型安全:
@opencode-ai/plugin提供完整 TypeScript 类型 - 双重分发:支持 npm 发布和本地文件加载
- 自定义工具注入:Plugin 可以直接为 agent 添加新工具,这一点 Claude Code 不支持
- npm 生态:社区已有大量可用插件(如 wakatime 统计、Helicone 监控等)
六、Session 管理
OpenCode
bash
# 启动新 session
opencode

# 续接上次 session
opencode --continue

# 续接指定 session
opencode --session <id>

# Fork session(不影响原 session)
opencode --continue --fork

# 非交互模式运行
opencode run "解释这个项目的鉴权逻辑"

# 列出所有 session
opencode session list

# 导出 session 为 JSON
opencode export <session-id>

# 导入 session(从本地文件或分享链接)
opencode import session.json
opencode import https://opncd.ai/s/abc123
TUI 内的 session 操作:
/undo        # 撤销最后一次对话 + 文件变更(基于 git)
/redo        # 重做被撤销的操作
/compact     # 压缩对话上下文(= summarize)
/new         # 开启新 session
/sessions    # 列出并切换 session
/share       # 生成分享链接
/export      # 导出为 Markdown
SDK 层面的 session 操作:
typescript
import { createOpencode } from "@opencode-ai/sdk"

const { client } = await createOpencode()

// 创建 session
const session = await client.session.create({
  body: { title: "Refactor auth module" }
})

// 发送 prompt
await client.session.prompt({
  path: { id: session.id },
  body: {
    parts: [{ type: "text", text: "Refactor the auth middleware" }],
  },
})

// 回退一条消息
await client.session.revert({
  path: { id: session.id },
  body: { messageID: "msg_xxx" },
})

// 列出子 session
const children = await client.session.children({
  path: { id: session.id },
})
Claude Code
bash
claude --resume           # 续接上次
claude --resume <id>      # 续接指定 session
claude --fork-session     # fork session
claude config rewind      # 回退
claude config summarize   # 总结
对比
两者在 session 管理上功能相近。主要区别:
- OpenCode 的
/undo基于 git 快照,能精确恢复文件状态;Claude Code 的rewind功能类似 - OpenCode 的
/share功能是独有的,可以一键生成会话链接给团队 - OpenCode 提供完整的 SDK API,可以编程式管理 session(适合 CI/CD 集成)
Fork 与 Worktree
一个典型的场景:你正在主分支上做着 A 功能,突然想开一个独立分支试验 B 方案。最理想的方式是,把当前对话 fork 一份到新的 git worktree 中,两个分支并行推进,互不干扰。
Claude Code 把 fork 和 worktree 做成了组合拳:
bash
# fork 会话 + 创建新 worktree,一步到位
claude --continue --fork-session --worktree experiment-b
一个命令下去,对话历史被复制到新 worktree,你就可以在新分支上基于已有上下文继续推进。
OpenCode 的 --fork 只复制对话,不创建 worktree。
bash
# 这句话只 fork 对话历史,不碰 git worktree
opencode --continue --fork
OpenCode 目前 没有 --worktree CLI 标志,配置 schema 中也没有对应的配置项。两者是正交的——fork 归 fork,worktree 归 worktree。
不过,有三个变通方案可以达到类似效果:
方案一:手动两步走(最直接)
bash
# 先创建 worktree
git worktree add -b experiment-b ../experiment-b

# 再在里面起一个新 session
opencode ../experiment-b
方案二:Fork 后转向
bash
# fork 当前对话
opencode --continue --fork

# 在对话中告诉 agent 切换到 worktree 工作
> 你现在的工作目录是 ../experiment-b,这是一个 git worktree,在新分支上继续。
方案三:Plugin 封装
用 Plugin 注册一个 create_worktree 自定义工具,在对话中直接调用:
typescript
// .opencode/plugins/worktree.ts
import type { Plugin } from "@opencode-ai/plugin"

export const WorktreePlugin: Plugin = async ({ $ }) => {
  return {
    tool: {
      create_worktree: tool({
        description: "创建一个 git worktree 并从当前分支 fork",
        args: {
          branch: tool.schema.string(),
          path: tool.schema.string(),
        },
        async execute(args, ctx) {
          await $`git worktree add -b ${args.branch} ${args.path}`
          return `已创建 worktree:${args.path},分支:${args.branch}`
        },
      }),
    },
  }
}
这样在 OpenCode session 里就能直接让 agent 执行 fork + worktree 组合操作。
补充:OpenCode 内部其实已经在用 git worktree——Web UI / Desktop 的「Workspaces」功能依赖 worktree 管理多项目沙箱(存放在
~/.local/share/opencode/worktree/),但这是给 GUI workspace picker 用的,和 TUI 的 fork 流程还没有打通。社区也有 PR(#25379)在做.worktreeinclude支持,说明这块在活跃迭代中,对标 Claude Code 的一键体验值得期待。
七、实际使用场景对比
场景一:代码库探索
Claude Code
bash
# 进入项目,开始对话
claude
> How is authentication handled in this project?
Claude Code 依赖模型对代码的读取和推理。你需要手动 @ 引用文件,或者让模型自己搜索。
OpenCode
opencode
@explore 找出这个项目中所有的鉴权相关逻辑,包括 middleware、token 验证、session 管理
OpenCode 的 explore subagent 专门做代码探索,只读权限,速度快。另外可以结合 @ 模糊搜索:
How is auth handled in @packages/functions/src/api/index.tsOpenCode 的优势:LSP 让 explore agent 能利用符号索引和类型信息,对大型代码库的探索效率更高。
场景二:实施一个跨文件重构
Claude Code
> Refactor the user service to use the new database layer.
> Make sure all callers are updated.
Claude Code 会搜索相关文件、分析影响范围、逐一修改。但由于缺乏实时类型检查,最终可能遗漏某些调用点,你需要额外运行编译器或测试来发现。
OpenCode
> Refactor the user service to use the new database layer.
> Make sure all callers are updated.
流程区别:
- OpenCode 修改代码
- LSP(如 gopls/pyright/typescript)立即检查所有受影响文件
- 如果有类型错误,LLM 自动看到诊断信息并修正
- 最终输出的是已经通过语言服务器验证的代码
场景三:持续集成(CI/CD)
Claude Code
bash
# 在 GitHub Actions 中
claude -p "Review this PR for security issues" --output-format stream-json
OpenCode
bash
# CLI 非交互模式
opencode run --agent plan "Review this PR for security issues"

# 用 SDK 编程式调用
opencode serve &
curl -X POST http://localhost:4096/session/{id}/prompt \
  -H "Content-Type: application/json" \
  -d '{"parts":[{"type":"text","text":"Review this PR..."}]}'
typescript
// 或用 TypeScript SDK 构建更复杂的工作流
import { createOpencode } from "@opencode-ai/sdk"

async function reviewPR(prDiff: string) {
  const { client } = await createOpencode()
  const session = await client.session.create({
    body: { title: "PR Review" }
  })
  const result = await client.session.prompt({
    path: { id: session.id },
    body: {
      parts: [{ type: "text", text: `Review this diff:\n${prDiff}` }],
      format: {
        type: "json_schema",
        schema: {
          type: "object",
          properties: {
            approved: { type: "boolean" },
            issues: {
              type: "array",
              items: {
                type: "object",
                properties: {
                  severity: { type: "string", enum: ["high", "medium", "low"] },
                  file: { type: "string" },
                  description: { type: "string" },
                },
              },
            },
          },
          required: ["approved", "issues"],
        },
      },
    },
  })
  return result.data.info.structured_output
}
OpenCode 的 SDK + 结构化输出能力让自动化工作流更灵活。
场景四:多项目并行工作
Claude Code
Claude Code 是单会话模式。要同时处理两个项目,需要开两个终端窗口:
bash
# Terminal 1
cd ~/project-a && claude

# Terminal 2
cd ~/project-b && claude --resume
OpenCode
OpenCode 原生支持多 session 并行(而且是同一个 TUI 内的多 session):
# 在 TUI 中
/new                    # 开一个新 session(原有 session 保留)
# 双向切换查看不同 session 的进展
同时 SDK 级别的 server 模式支持多个客户端同时连接:
bash
# 启动 server
opencode serve --port 4096

# 多个终端 attach 到同一个后端
opencode attach http://localhost:4096
opencode attach http://localhost:4096 --session abc123
八、配置体系对比
配置文件位置
| 层级 | OpenCode | Claude Code |
|---|---|---|
| 全局配置 | ~/.config/opencode/opencode.json | ~/.claude/settings.json |
| 项目配置 | <project>/opencode.json | <project>/.claude/settings.json |
| TUI 配置 | ~/.config/opencode/tui.json | 无 |
| Agent 定义 | ~/.config/opencode/agents/*.md | 无 |
| 命令定义 | .opencode/commands/*.md | 无 |
| Plugin | .opencode/plugins/*.ts | 无 |
| Skill | .opencode/skills/*/SKILL.md | .claude/skills/*/SKILL.md |
| 说明文件 | AGENTS.md | CLAUDE.md |
OpenCode 兼容 Claude Code 配置
OpenCode 自动读取 .claude/skills/ 和 .claude/CLAUDE.md,如果你之前用 Claude Code,迁移到 OpenCode 只需安装,原有的 skill 和 instructions 可以继续用。
九、隐私与部署
| 场景 | OpenCode | Claude Code |
|---|---|---|
| 代码传输 | 仅发送给 LLM 提供商 | 仅发送给 Anthropic API |
| 上下文存储 | 本地存储,不传回 OpenCode 服务器 | 本地存储 |
| 会话分享 | 可选(/share) | 不支持 |
| 企业部署 | Managed Settings + MDM + mTLS | 无 |
| 离线使用 | 支持(搭配本地模型如 Ollama) | 不支持 |
十、总结:如何选择?
选 OpenCode 如果你的需求是:
- 需要多模型灵活性(不想被单一提供商锁定)
- 重视代码正确性(LSP 实时检查是刚需)
- 需要可编程扩展(Plugin + SDK 构建自定义工具和工作流)
- 团队需要会话分享和多会话并行
- 预算敏感(可接入免费模型或已有订阅)
- 企业环境有安全合规要求(Managed Settings, MDM)
选 Claude Code 如果你的需求是:
- 深度绑定 Claude 模型生态,追求原生 Claude Opus/Sonnet 的分工调度
- 偏好更成熟的 CLI 体验(Claude Code 发布时间更长,打磨更久)
- 需要 worktree 功能进行多分支并行开发
- 喜欢 Anthropic 官方的第一方支持
其实可以两个都用
OpenCode 可以接入 Anthropic API,使用和 Claude Code 相同的模型。你可以:
bash
# 日常开发用 OpenCode(LSP + 多 agent + plugin)
opencode

# 需要 Claude 原生功能时切回 Claude Code
claude
两者共享 .claude/ 配置目录,不冲突。
附录:快速迁移指南
如果你当前在用 Claude Code + DeepSeek 代理(类似这样的配置):
jsonc
// ~/.claude/settings.json
{
  "env": {
    "ANTHROPIC_BASE_URL": "https://api.deepseek.com/anthropic",
    "ANTHROPIC_MODEL": "deepseek-v4-pro[1m]"
  }
}
迁移到 OpenCode 只需:
bash
# 1. 安装
curl -fsSL https://opencode.ai/install | bash

# 2. 配置 DeepSeek 提供商
opencode auth login
# 选择 DeepSeek,填入 API Key

# 3. 进入项目
cd /path/to/project
opencode
/init
OpenCode 会自动读取你的 .claude/ 下的 skills 和 instructions,无缝过渡。